Magical Slide Whistle
ECE5725 Project
A Project By Wooyoung Cho (wc556) and Yangou Du (yd395).
Demonstration Video
Introduction
The main goal of this project is for the RPi to control a slide whistle as a musical instrument and play songs. A stepper motor will drive a linear gear rail that will control the slide of the whistle. The system is programmed so that it will automatically move the slide to the correct location to produce notes of a song. This system will remind the human “musician” when they should play our autonomous instrument, resulting in a Magical Slide Whistle that “plays itself”.
Project Objective:
- Using the RPi to Control the stepper motor motion with a diver.
- Build a frame to hold everything in place.
- Map notes to slide position for the slide whistle.
- Program songs for the system.
- Create user interface on the piTFT screen.
Design and Testing
Assembling materials
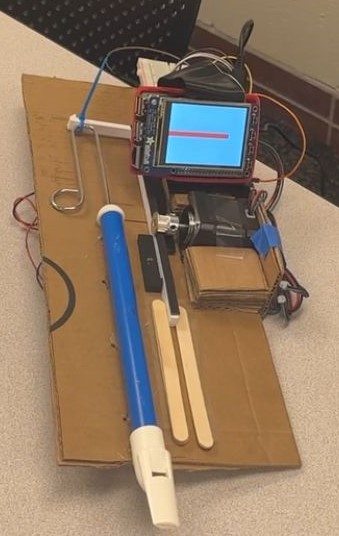
First we needed to implement a stepper motor control to play the slide whistle. We successfully implemented a stepper motor control using a part that was available in the lab. However, we quickly realized that even at the maximum speed available, according to the specifications (15 rpm), the speed would be nowhere near enough for our purposes as the notes would not sound like music. So we ordered the Nema 17 Stepper motor and the A4988 Stepper motor driver. For the power transmission we ordered the GT2 Timing Belt Pulley, and 5mm Bore 20 Teeth Aluminum Timing Pulley. Also a slide whistle obviously has to be bought. While waiting for the order of parts to arrive we designed and 3D printed the arm that is going to move the slide. When the orders arrived, we prototyped a simple frame to hold everything together. The timing belt was super glued to the arm.
Motion and distance control
We wired up the stepper motor and its driver to the raspberry pi. The stepper motor driver takes in two inputs and the step direction. The step is a square function where each square is a step. The direction input has the convention where a 0V input is in the counterclockwise direction and a high voltage input is in the clockwise direction.
We then set up the time of the flight sensor. However, at the start there was a connection issue as the Pi would not connect to the sensor. After much trial and error, we discovered there was a soldering issue which was resolved by resoldering all of the pins. We wrote a program that prints the measured distance onto the serial monitor and proceeded to import the proper libraries.
We used a glue gun to glue the ToF (Time-of-Flight) sensor to a cardboard frame. Next, we merged the code together, resulting in the script now taking an input number that drives a rack to the corresponding distance.
We found that from using the ToF sensor, the measurements were not stable enough for our purposes. Therefore, we tried out a method where the number of steps were counted starting out at the shortest length where the arm of the slide whistle could physically be. Thus, we can have a consistent starting point. We implemented code that can move the slide in a direction for a specific number of steps. If we keep track of what step we are on, we can control where to move the slide. The range of our slide motion is between 0-800 steps. We noticed that our system was a little shaky, which may lead to errors in our control. So, we used popsicle sticks to reinforce the track and taped down our motor. After reinforcing the frame to reduce the slippage of moving parts, our distance control became precise and repeatable enough for our purposes.
Note Mapping
Next, we tried to map notes to distances. A problem we ran into was that we couldn't make clear notes when the whistle was tightly held onto our frame. Through some testing. we realized tying down on the main tube of our instrument interfered with the acoustics of the whistle. To resolve this, we glued our whistle down on the head and end of the whistle (the white part) such that the main tube is suspended in the air. After we were able to make a clear note, we moved the slide incrementally and mapped out the note the instrument made.
Coding songs was the next logical step. We wrote music as a list of tuples: ( note, length of note). We implemented a Python script named play_Music.py that moves the slide to the corresponding positions and waits for the duration of the note. Now the user just has to blow into the whistle in sync with the program. We decided to use the screen to remind us when the user should blow. We painted the screen white when the user should blow and black otherwise. We tried this out, but it didn’t go well as it was hard to know how long each note was, so we should add a progress bar for each note. The songs we had at the time were Hot Cross Bun, Mary Had a Little Lamb, and My Heart Will Go On.
User interface
Next we implemented a progress bar so that it was easier for the user to know how long each note was, making the synchronization easier. We implemented it by editing the wait time of the note and drawing rectangles using the pygame library. Our progress bar consisted of 5 increments, so we divided the length of each note by 5. In each increment “i”, we would draw a red rectangle at the i-th x location: width of screen * i/5. The width of the rectangle is one-fifth the width of the screen. The y location of the rectangles are in the center of the screen. We flipped the screen at the end of each increment.
Up to now, we have been selecting songs by typing inputs. This is not going to work in the end, so we implemented a menu screen. The menu has four buttons, three for songs and one for quitting the program. Using the coordinate of the tap on the TFT screen we call the play Song function to play the corresponding song. The buttons are modified using the buttons in lab 2. After we added the menu, we realized there wasn’t enough time for the user to prepare themselves so a countdown of 3 seconds was implemented.
After trying the song we found that My heart will go on was way too hard so we replaced it with Twinkle twinkle little star.
Finally, we used battery packs as the power source and tested if the system still works. Being sure that everything worked, we fixed everything to the frame using velcro, zip ties, and tape. We’ve also used cron to run the program after booting.
Result
In the end we came up with a self playing magical side whistle that plays songs. In testing, blowing on a wind pipe instrument is harder than initially thought. It was found that higher notes need to be blown harder to make clear sounds. Thus making clear sounds for each song and timing still required some practice on the part of the user. Also it sounds weird if the user blows between notes when the slide is being moved, so it is better to end each note a little early. We abandoned my heart and will go on as we are not skilled enough to execute the song. In addition it takes time for the motor to go from note to note so songs with a large jump in range don't work as well. The three songs that our system provides are Hot Cross Bun, Mary Had a Little Lamb, and Twinkle Twinkle Little star.
Conclusions
Incorporating elements of what we have learned in class, we were able to design and build an embedded system: The Magical Slide whistle. On the pi TFT screen the user can choose from a menu of songs. When a song is selected, the pi will control a stepper motor to move the slide of the whistle to the correct position for each note of the song, and the TFT screen displays a progress bar for each note. So the user only needs to blow into the whistle with the correct timing to play songs.
Future Work
Though we are quite happy with our work, future improvement can be made. The most obvious next step is to program more songs. We can also try using a pump to control the air flow into the instrument, making the system truly “self playing” and making an overly complicated music box. However this might be very challenging as we found that each note requires a different amount of air flow.
Work Distribution

Project group picture

Wooyoung Cho
wc556@cornell.edu
Most of the software design and coding, and helped with everything else.

Yangou Du
yd395@cornell.edu
Most of the ordering the parts, hardware design and prototyping, and documentation, and helped with everything else.
Parts List
- Raspberry Pi - Provided in lab
- Pi TFT screen - Provided in lab
- Slide whistle, $5
- Nema 17 Stepper motor, $14
- A4988 Stepper motor driver, $1.7 per piece
- GT2 Timing Belt Pulley, 5mm Bore 20 Teeth Aluminum Timing Pulley, $11
- TofF sensor - Provided by the lab
- Breadboard, battery packs, and Wires - Provided in lab
Total: $31.7
References
Stepper motor and driver wiringNoob notes (for coding the songs)
Pygame documentation
Code from lab2 and lab3
Code Appendix
// playMusic.py
import pygame
from pygame.locals import *   # for event MOUSE variables
import time
import os
import time
import pigpio

# Define the STEP and DIR pins
stepPin = 6  # Connect to the A4988 STEP pin
dirPin = 26   # Connect to the A4988 DIR pin
step_frequency = 1000 #1000 steps per sec
pulse_width = int(1e6/ step_frequency)
# Set up the GPIO pins
pi = pigpio.pi()

A=800
B=700
Bf=750
BF=750
C=650
Df=600
D=550
Ef=500
E=460
F=410
Gf=400
G=350
Af=300
A2=285
Bf2=250
B2=230
C2=200
D2=160


P=999

minDist = 29
maxDist = 145
pi.set_mode(stepPin, pigpio.OUTPUT)
pi.set_mode(dirPin, pigpio.OUTPUT)
decrease = 1 # decrease the distance from the sensor?
increase = 0
current_step = 0
HCB = [(B2,1),(A2,1),(G,2),(B2,1),(A2,1),(G,2),(G,0.5),(G,0.5),(G,0.5),(G,0.5),(A2,0.5),(A2,0.5),(A2,0.5),(A2,0.5),(B2,1),(A2,1),(G,2)]
Bolero = [(C,3),(B,1),(C,1),(D,1),(C,1),(B,1),(A,1),(C,2),(C,1),(A,1),(C,3)]
#HotCrossBun
MLL=[(D,0.75),(C,0.75),(Bf,0.75),(C,0.75),(D,0.75),(D,0.75),(D,1.5),(C,0.75),(C,0.75),(C,1.5),(D,0.75),(F,0.75),(F,1.5),(D,0.75),(C,0.75),(Bf,0.75),(C,0.75),(D,0.75),(D,0.75),(D,0.75),(D,0.75),(C,0.75),(C,0.75),(D,0.75),(C,0.75),(Bf,2.25)]
#MaryhadaLittleLamb
Titanic=[(F,0.5),(G,0.5),(G,0.5),(A,2.5),(G,0.5),(F,0.5),(G,0.5),(C2,2.5),(A,0.5),(C2,0.5),(D2,2),(C2,2),(G,4),(F,0.7),(F,0.3),(F,0.5),(F,0.5),(E,0.5),(F,1),(F,0.5),(E,0.5),(F,1),(G,0.5),(A,1),(G,1),(F,0.7),(F,0.3),(F,0.5),(F,0.5),(E,0.5),(F,1),(F,0.5),(C,3),(P,1),(F,2),(G,1.5),(C,0.5),(C,1),(Bf,0.5),(A,0.5),(G,1),(A,0.5),(Bf,0.5),(A,1),(G,0.5),(F,0.5),(E,0.5),(F,1),(E,0.5),(D,2),(C,2),(F,2),(G,1.5),(C,0.5),(C2,1),(Bf,0.5),(A,0.5),(G,1),(A,0.5),(BF,0.5),(A,1),(G,0.5),(F,0.5),(E,0.5),(F,1),(E,0.5),(E,0.5),(F,1),(G,0.5),(A,1),(G,1),(F,3)]
Twinkle=[(C,1),(C,1),(G,1),(G,1),(A2,1),(A2,1),(G,1),(F,1),(F,1),(E,1),(E,1),(D,1),(D,1),(C,1),(G,1),(G,1),(F,1),(F,1),(E,1),(E,1),(D,1),(G,1),(G,1),(F,1),(F,1),(E,1),(E,1),(D,1),(C,1),(C,1),(G,1),(G,1),(A2,1),(A2,1),(G,1),(F,1),(F,1),(E,1),(E,1),(D,1),(D,1),(C,1)]
song_dict = dict([])
song_dict["HCB"] = HCB
song_dict["MLL"] = MLL
song_dict["Titanic"] = Titanic
song_dict["Bolero"] = Bolero
song_dict["Twinkle"] = Twinkle
#99 is b
#105 is do
os.putenv('SDL_VIDEODRIVER', 'fbcon')   # Display on piTFT
os.putenv('SDL_FBDEV', '/dev/fb1')
os.putenv('SDL_MOUSEDRV', 'TSLIB')     # Track mouse clicks on piTFT
os.putenv('SDL_MOUSEDEV', '/dev/input/touchscreen')
song = ""
def move_steps(steps, step_frequency, direction):
	pi.write(dirPin, direction)
	pulse_width = int(1e6/step_frequency)
	for _ in range(steps):
		pi.write(stepPin,1)
		time.sleep(pulse_width/2e6)
		pi.write(stepPin,0)
		time.sleep(pulse_width/2e6)
def find_dir_step(current_step, new_step):
	diff = new_step - current_step
	if diff > 0:
		return diff, decrease
	else:
		return -diff, increase
TEXT = 1
RECT = 0

def menu():
	pygame.init()
	pygame.mouse.set_visible(False)
	WHITE = 255, 255, 255
	BLACK = 0,0,0
	screen = pygame.display.set_mode((320, 240))
	my_font = pygame.font.Font(None, 40)
	level2_buttons = {"MLL":(50,50), "Quit":(50,180), "Twinkle":(210, 50), "HCB": (210,180)}
	for my_text, text_pos in level2_buttons.items():
		text_surface = my_font.render(my_text, True, WHITE)
		rect = text_surface.get_rect(center=text_pos)
		rect.width = 25
		rect.height = 25
		level2_buttons[my_text] = [rect,text_surface]
	screen.fill(BLACK)               # Erase the Work space
	for button, stuff in level2_buttons.items():
		screen.blit(stuff[TEXT], stuff[RECT])
	pygame.display.flip()
	cur = time.time()
	while time.time() - cur < 20:
		for event in pygame.event.get():
			if(event.type is MOUSEBUTTONDOWN):
				pos = pygame.mouse.get_pos()
				x,y = pos
				screen.fill(BLACK)
				print(pos)
				if y > 120:
					if x < 160:
						quit()
						return "quit"
					else:
						return "HCB"
				elif y < 120:
					if x < 160:
						return "MLL"
					else:
						return "Twinkle"


def play(music):

	pygame.init()
	pygame.mouse.set_visible(False)
	WHITE = 255, 255, 255
	BLACK = 0,0,0
	screen = pygame.display.set_mode((320, 240))
	my_font = pygame.font.Font(None, 50)
	screen.fill(BLACK)
	countdown = {"3":(160,120), "2":(160,120), "1":(160, 120)}
	for my_text, text_pos in countdown.items():
		text_surface = my_font.render(my_text, True, WHITE)
		rect = text_surface.get_rect(center=text_pos)
		rect.width = 25
		rect.height = 25
		countdown[my_text] = [rect,text_surface]
	for button, stuff in countdown.items():
		screen.blit(stuff[TEXT], stuff[RECT])
		pygame.display.flip()
		time.sleep(1)
		screen.fill(BLACK)               # Erase the Work space
	box_num = 5
	current_step = 0
	step_frequency = 1000
	for (note,length) in music:
		if(note<=800):
			(steps, direction) = find_dir_step(current_step, note)
			move_steps(steps, step_frequency, direction)
			screen.fill(WHITE)
			current_step = note
			for i in range(box_num):
				rect_color = (255,0,0)
				rect_x = i/box_num * 320
				rect_y = 110
				rect_width = 320/box_num
				rect_height = 20
				pygame.draw.rect(screen, rect_color, (rect_x, rect_y, rect_width, rect_height))
				pygame.display.update()
				time.sleep(length * 0.7/box_num)
			screen.fill(WHITE)
			pygame.display.update()
			#time.sleep(0.1)
		else:
			time.sleep(length)
	(steps, direction) = find_dir_step(current_step, 0)
	move_steps(steps, step_frequency, direction)
	pygame.quit()


try:
# Set the direction (clockwise or counterclockwise)
#	move_steps(steps=foo, step_frequency=step_frequency, direction=decrease)
#	time.sleep(0.2)
	while(True):
		song = menu()
		if song == "quit":
			quit()
		play(song_dict[song])
finally:
	pi.wave_tx_stop()
	#pi.wave_delete(wave_id)
	pi.stop